Why am I here?
When I first started jumping into MVI and learning about it, there were few if any sources that I remember being complete enough for me to implement the pattern on my own. I don't like that. I could understand the benefits of it, but couldn't picture how it would look in production without a basic understanding. I want to solve that problem for the next person, so let's build an MVI app with only the libraries available in a new Android Studio project.
The examples and information in the rest of the article will be making use of Kotlin and the following Android components:
If you don't know these components too well it would be good to take the time to catch up on them. They're extremely beneficial in day to day Android Development.
Before getting into the meat of things, if you're one of those people who just want's to see code, here it is. Most of the code samples I will be using here are derivations of this project. If something isn't clear, please post an issue or submit a merge request and I'll do my best to get to it in a timely manner.
Why MVI?
Before getting into the details of what MVI is; what is its advantage? It's a clean scalable way of producing and consuming, events, actions, and state within your application. It allows for a structured and consistent data path between components making your app more predictable. This allows for a very granular knowledge of your applications state at any given point in time. Do you want to know exactly what was displayed to the user and what the last action the user took was to produce that mess of a stack trace? Well, MVI makes this very simple. Also, and extremely importantly, everything is much easier to test.
Just as importantly, why wouldn't you want to use an MVI pattern? This brings a debate, but MVC, MVP, and MVVM all have a seat at the table and all patterns have their own strengths and weaknesses. If you're looking to have a app that has only a couple of simple features, MVI probably isn't what you're looking for. When your project has a definable finite scope with one or two data sources and a couple of views, I'd consider something simpler. MVI's real advantage is when you're dealing with a production app that can have multiple complex states.
What is MVI?
MVI stands for Model-View-Intent. It's a reactive, unidirectional pattern, that emits a state from the model, which is then consumed by the view, which listens for a user interaction and then emits a user's intent back to the model. Lets use a pretty standard graphic to drive that point home:
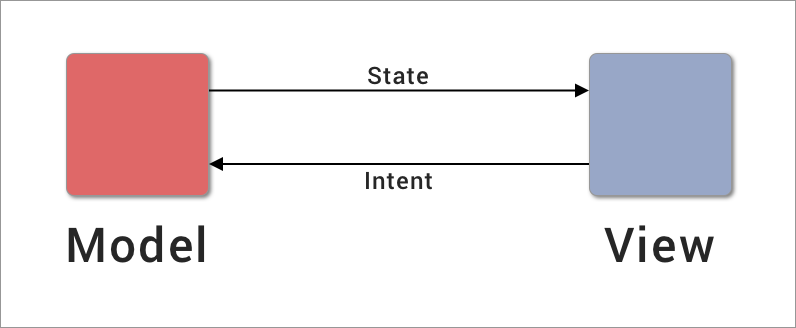
That's it. Nothing crazy. Lots of models try to draw the intent as it's own entity, and it can be, but an actual intent is nothing more than a notification coming from the view to the model to relate an action or event that occured.
This is just a high level overview to illustrate what we're trying to accomplish overall. Let's talk about how this works in practice.
MVI in Android
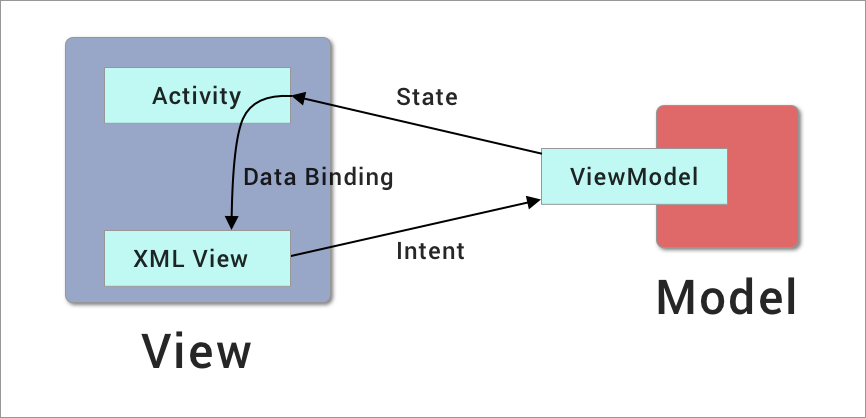
In the diagram above we can see we're starting to get a little more complex as we get into implementing the Android components to support our MVI implementation. There are a few new things happening here:
- We have the ViewModel which emits changes coming from the model layer to the Activity.
- Note the pass-through from the Activity to the XML View via data binding at the view layer. The view layer should have little to no logic and the state at this point should be immutable. Also important here, a receiving entity such as the Activity here consuming the state, should not communicate back with the producing entity, the ViewModel.
- The XML View produces an intent, which is then received and consumed by the ViewModel.
The consumer and producer at each point in this pattern is a key portion of our implementation. A consumer should have a single entrance point for receiving information from the producer. A producer can have multiple methods transmitting data to the consumer, but the number should be kept to an absolute minimum.
Let's break it down further and concentrate on the ViewModel to Activity interaction:
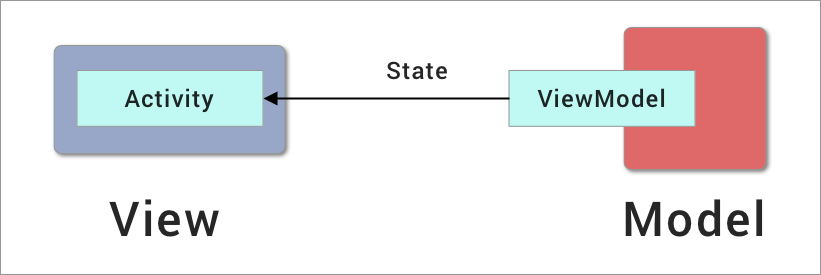
In this portion of our pattern, the ViewModel is the producer and the Activity is our consumer. The Activity in this case can realistically be a Fragment or another component that can hold and provide data to a view. While coroutines and RxAndroid are the more efficient way to implement emitters, they compound the complexity significantly so we won't cover them here, that said, I highly encourage anyone to read up on how to implement MVI with them. For this example, to keep things simple, we use LiveData as our emitter type.
As mentioned, we want to keep emitters from the producer to a minimum. Generally, in a ViewModel you'll have just two emitters, a State emitter and an Effect emitter. State is persistent and immutably maps to your View, while an Effect is a one time occurrence such as a Toast or Snackbar message. The LiveData approach is pretty straight forward. The ViewModel posts updates to the emitters and the Activity has a single Observer handling those emissions. So, with that in mind, how does a single method consume both a State and an Effect?
We use sealed classes:
// A simple example of a sealed class for representing a State or Effect
sealed class MviState {
    class Content(val stateData: MviStateData): MviState()
    object Loading : MviState()

    abstract class Effect : MviState()
    object InvalidNumberError : Effect()
}
If you're not familiar with sealed classes think of them as super enums where the members can have unique data and logic (and more).
This allows us to have a single observer in our Activity:
	val contentHandler = MviContentHandler(binding)
    val stateObserver = Observer<MviState?> {
        // null state indicates there is no action needed
        it ?: return@Observer

        // Hide the loading state
        if (it != MviState.Loading) {
            hideLoading()
        }

        when (it) {
            is MviState.Loading -> showLoading()
            is MviState.InvalidNumberError -> {
                Toast.makeText(this, R.string.msg_invalid_number_selected, Toast.LENGTH_SHORT).show()
            }
            is MviState.Content -> contentHandler.handleContent(it)
        }
    }

    // Note, we're observing both effect and state with the same observer
    viewModel.effect.observe(this, stateObserver)
    viewModel.state.observe(this, stateObserver)
We're observing the MviState type, which has both State and Effect types declared, so we are able to use a simple when filter to route our received state to the proper handler. See the MviContentHandler class, remember, we want the logic in the Activity to be super simple, so we offload logic to a handler so we don't pollute our activity, incidentally also giving us an isolated class we can now unit test outside of the activity. An example of logic that may go into a ContentHandler is a conditional animation based on state.
So what does the ViewModel look like?
class MviViewModel : ViewModel {
	// Scope is public and using MutableLiveData for brevity and simplicity, see the GitLab code for a proper implementation
	val state = MutableLiveData<MviState>()
	val effect = MutableLiveData<MviState.Effect?>()

	/**
     * A router to simplify the logic of determining whether to update the [effect] or [state]
     */
    private fun update(newState: MviState) {
        when (newState) {
            is MviState.Effect -> {
            	effect.value = newState
            	// Set value to null so that if the observer is resubscribed on lifecycle change, the effect doesn't occur twice
            	effect.value = null
            }
            is MviState.Loading,
            is MviState.Content -> state.postValue(newState)
        }
    }
}
When information is updated, the update function is called with the new desired state and routes that state to the proper LiveData receiver.
Notice the is MviState.Effect is setting effect's value which takes a type of MviState.Effect?. So if we have the case of our MviState.InvalidNumberError which extends MviState.Effect, this sets the value of the LiveData implementation behind effect that the Activity is observing, then setting the value of effect to null so it is not repeated. Nullifying the effect is one way of doing this, but a more reliably way would be using a library such as LiveEvent once you're more comfortable with this pattern.
In the case of MviState.Loading and MviState.Content, we're posting it once and not nullifying the result as these states are persistent for the lifetime of the view unless updated from the ViewModel.
We're using postValue in the example to send a state to the LiveData this allows us to asynchronously update state from any thread, whereas setting the value explicitly is a synchronous operation that must occur on the Main thread.
Our flow ends up being this:
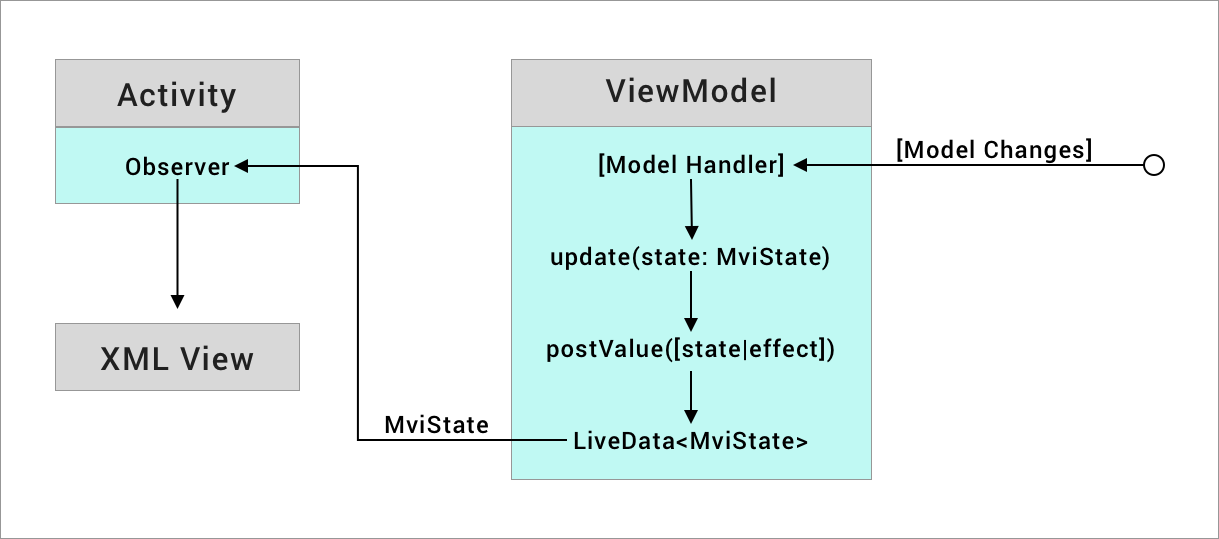
Now that we have an understanding of how we emit updates from the ViewModel to the Activity, what does the process between the Activity and the View look like? We've already seen this:
class MviActivity : AppCompatActivity() {

	// ... omitting onCreate logic for brevity in this portion

    private fun observeData(binding: ActivityMainBinding, viewModel: MviViewModel) {
        val contentHandler = MviContentHandler(binding)
        val stateObserver = Observer<MviState?> {
            // null state indicates there is no action needed
            it ?: return@Observer

            // Hide the loading state
            if (it != MviState.Loading) {
                hideLoading()
            }

            when (it) {
                is MviState.Loading -> showLoading()
                is MviState.InvalidNumberError -> {
                    Toast.makeText(this, R.string.msg_invalid_number_selected, Toast.LENGTH_SHORT).show()
                }
                is MviState.Content -> contentHandler.handleContent(it)
            }
        }

        viewModel.effect.observe(this, stateObserver)
        viewModel.state.observe(this, stateObserver)
    }
}
The stateObserver here is attached to both viewModel.effect and viewModel.state, allowing a single receiver to route both states and effects. But the real simplicity of this all is facilitated by data binding within the MviContentHandler class:
class MviContentHandler(private val binding: ActivityMainBinding) {
    fun handleContent(content: MviState.Content) {
        binding.state = content.stateData
        binding.notifyPropertyChanged(BR.state)
    }
}
This is a very simple implementation that binds state changes to the view. No need to setText values on TextViews no need to change an outline color from primary to error to show your user they had invalid input, the validation logic should have all been handled in the ViewModel and then provided to the MviState.Content's stateData, an immutable data class. On binding the stateData object to the View, the data binding in the XML handles all the messy findViewById<TextView>(R.id.myTextView).apply { text = stateData.myText } type logic for us.
The majority of this state data should be simple, and something as simple as a single value assignment can safely be offloaded to the data binding in the XML. Sometimes bindings can be a little more complex than a single assignment (think setting the value of a RadioGroup based on an enum), but this logic can be moved to a custom Binding Adapter, which could then be unit tested, ensuring quality.
The XML has our stateData now and has bound the data to the View. But what about view interactions? How does a user action on the View get handled?
Enter the Actor and Action classes. An Action is a programatic representation of a user's or app's intent (our ‘I’ in MVI) to do something. Every different intent that can be in a view should map to a single Action. So how are Actions represented? Just like a State, by a sealed class:
sealed class MviAction {
    /**
     * Action type indicating the user desires to add the given [value] to the current state value
     */
    class AddValue(val value: String?) : MviAction()
}
In the above example our view displays a number held by the stateData object, but also has an EditText view where the user can specify a number they desire to add to the state. The user would then click a button emitting the MviAction.AddValue action, passing in the value of the EditText.
The next piece is the Actor. An Actor emits an Action. The Actor is a mapping of an event in the view to an Action. The Actor should have a 1:1 correlation with possible events in the view, but could have a n:1 correlation to an Action. Here's some code to demonstrate:
class MviActor(private val emit: (MviAction) -> Unit) {

    /**
     * The user clicked the add button intending to add [addValue] to the current value in the state
     */
    fun addClicked(addValue: String) = emit(MviAction.AddValue(addValue))
}
The Actor may look similar to an Action, but they're different. Remember, a Action is a programmatic representation of an intent and a Actor is the mapping of an event to Action. In the above example, addClicked is called in the onClick function of a Button, this is the 1:1 correlation. Now, say you wanted a custom binding to also emit the same Action/intent from a keyboard IME action, your Actor would then look like this:
class MviActor(private val emit: (MviAction) -> Unit) {

    /**
     * The user clicked the add button intending to add [addValue] to the current value in the state
     */
    fun addClicked(addValue: String) = emit(MviAction.AddValue(addValue))

    /**
     * The user clicked the keyboard OK button intending to add [addValue] to the current value in the state
     */
    fun imeActionOkClicked(addValue: String) = emit(MviAction.AddValue(addValue))
}
The implementation of the functions are the same, but the function names are different. This is the n:1 representation and helps simplify complex user interactions into clean programmatic implementations.
Moving on, let's talk about emit. emit is a high order function that takes in a MviAction type. In our example, this is what emits our Action to the ViewModel from the view so our view doesn't have to have knowledge of the ViewModel. This keeps our flow unidirectional, making it more predictable and easier to test. So what is emit? Going back to our MviActivity we can see how it is set:
class MviActivity : AppCompatActivity() {

    override fun onCreate(savedInstanceState: Bundle?) {
        super.onCreate(savedInstanceState)
        val binding: ActivityMainBinding = DataBindingUtil.setContentView(this, R.layout.activity_main)

        val viewModel = ViewModelProviders.of(this).get(MviViewModel::class.java)

        val actor = MviActor(viewModel::takeAction)

        binding.actor = actor
        binding.notifyPropertyChanged(BR.actor)

        observeData(binding, viewModel)
    }

    // ... omitted for brevity
}
viewModel::takeAction is a lambda function that passes in MviViewModel's takeAction method as an emitter to the MviActor in the previous example. This actor is then bound to the view using data binding. This abstracts the ViewModel from the view without exposing any logic and enforces the unidirection data flow.
To show how this actually looks in the XML view where we now have a bound actor and state:
<!-- Formatting omitted for brevity -->
<layout
        xmlns:android="http://schemas.android.com/apk/res/android"
        xmlns:tools="http://schemas.android.com/tools"
        xmlns:app="http://schemas.android.com/apk/res-auto">

    <data>
        <variable
                name="actor"
                type="me.danlowe.simplemvi.MviActor"/>
        <variable
                name="state"
                type="me.danlowe.simplemvi.MviStateData"/>
    </data>

    <LinearLayout
            android:layout_width="match_parent"
            android:layout_height="match_parent"
            tools:context=".MviActivity">

        <TextView
                android:id="@+id/currentValueText"
                android:layout_width="wrap_content"
                android:layout_height="wrap_content"
                android:text="@{state.currentValue}"/>

        <EditText
                android:id="@+id/numberToAdd"
                android:layout_width="match_parent"
                android:layout_height="wrap_content"/>

        <Button
                android:id="@+id/addButton"
                android:layout_width="wrap_content"
                android:layout_height="wrap_content"
                android:text="@string/add"
                android:onClick="@{() -> actor.addClicked(numberToAdd.getText().toString())}"/>
    </LinearLayout>
</layout>
With this, we have two variables a actor: MviActor and a state: MviStateData. Where we bind our immutable value state.currentValue to currentValueText and our actor's addClicked(...) method to addButton's onClick method. So we have MviStateData providing the “state” of the view, and MviActor “acting” on the user's intent by the mapping/translation of the event to the user's intended Action.
At this point, we have one thing left to do to literally come full circle… our ViewModel has to consume the emitted Action from the view:
class MviViewModel : ViewModel() {
    fun takeAction(action: MviAction) {
        when (action) {
            is MviAction.AddValue -> handleAddValueAction(action.value)
        }
    }

    private fun handleAddValueAction(addValue: String?) {
        val newState: MviState = when (val processValue = addValue?.toIntOrNull()) {
            null -> MviState.InvalidNumberError
            else -> {
            	// helpers to copy the stateData and add the "addValue"
            	// see GitLab for implementation
                val newStateData: MviStateData = currentStateData add processValue
                MviState.Content(newStateData)
            }
        }

        update(newState)
    }

    // ...previously discussed functionality and helper methods omitted for brevity
}
Remember our Activity passed viewModel::takeAction to our MviActor. takeAction here is the implementation. It serves as a router for received MviActions. Just like Observer in MviActivity this is our single entry point to consume an event in the ViewModel. takeAction filters on the MviAction type and routes the action or data to the appropriate handler. In this example, we only have one Action, MviAction.AddValue which has a content of value, the number to add to the current state. In handleAddValueAction, we validate our data, and send the appropriate MviState to our update method we discussed before.
Now that we've stepped through each of our MVI components, here is a more detailed flow diagram:
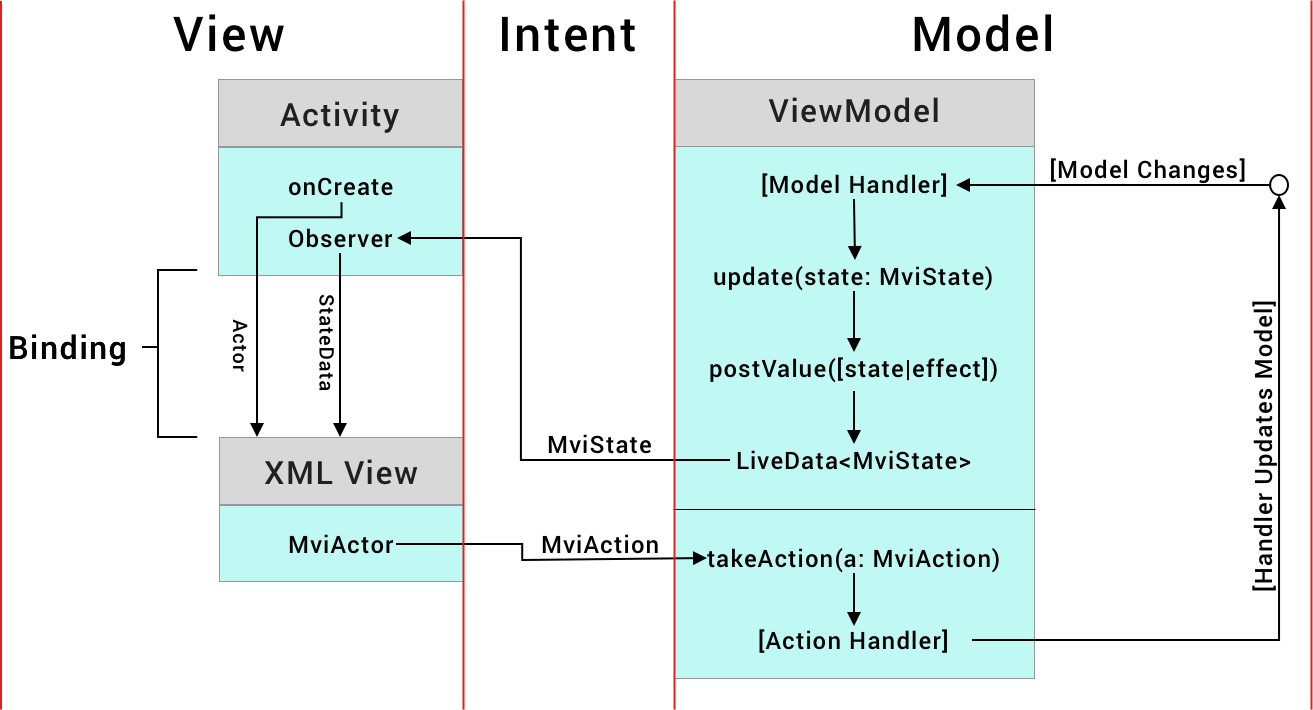
Tieing it all together now, we see the MVI layers.
At the Model layer, it's important to note for this example that the ViewModel, while it can contain the “Model” itself it isn't necessarily a Model, it's more of a facilitator for the Model to interact with the View. An event occurs within the model which requires an “Intent” to update the “View”, coming from the Model layer, this “Intent” is represented by the MviState which is emitted to the View.
The Intent layer consists of our MviState and MviAction. Both of these are sealed classes representing an event either coming from the app or the user that requires either the View or the Model to be updated respectively.
The View layer consists of our Activity and our XML View. Like the ViewModel's relationship to the “Model”, the Activity isn't necessarily part of a View itself, but can contain one, and acts more as a View facilitator. It's also important to note, that the Activity isn't required to be part of the MVI flow, the facilitator that the Activity represents in this model can interchangibly be represented by a Fragment or other high level view facilitator like a RecyclerView.Adapter, however you will have to carefully figure out how to safely consume a State from the Model layer, once you move out of an Activity or Fragment you have to be extremely protective of Lifecycle events interrupting your data flow.
Finally on the return trip from the View to the Model layer, the user creates an event (a button press) which calls the MviActor` emitting an MviAction"Intent" which is consumed by theViewModel`, which then handles the action, updates the model as appropriate, and starts the whole process over.
And that's it. We have created a predictable, unidirectional MVI data flow with only Android dependencies available when you create a “New Project”. The only modifications to your build.gradle will be for data binding, which require apply plugin: 'kotlin-kapt' and dataBinding { enabled = true }, that's it!
Final Notes
There's many reason why all the MVI examples for Android use libraries like RxAndroid and Kotlin Coroutines, but that's outside of the scope of this post. I wanted to present a simplistic approach to MVI without having to expect you, the reader, to jump outside of basic Android libraries to start implementing this pattern. I hope to focus on the advantages that RxAndroid and Coroutines in a future post.
YMMV. What was presented here is not the only way to construct MVI in Android. There will be variations in patterns and individual use cases. Nothing in software engineering is one size fit all.
As with most examples, don't take what I've provided as the single source of truth. There are places here where I cut corners to keep things simple. Those corners may or may not be major concerns for your project. When you reference this example think hard about the problem you intend to solve and how you can fit this lesson into your project, not how you can fit your project into this lesson.
What's next?
I have a number of items on my roadmap. Now that I'm back to publishing again, be on the lookout for posts on:
- Analytics everywhere, never guess a state again (hopefully!), leverage MVI to get the most out of your crash reports.
- The Loading, Content, Error (LCE) pattern, unlocking the power behind sealed classes.
- Koin, the service locator that quacks like dependency injection.
- Reverse engineering an APK, it's really not that hard.
- GitLab CI/CD for Android, it's cheap, easy, and super helpful.
- Implementing crashlytics.